List of Examples
Go to "Max Examples" or "WebAudio Examples".
Max Examples
The largest single collection of Max examples is the Max Cookbook. You can find specific examples there by title or by keyword search.
[Each image below is linked to a file of JSON code containing the actual Max patch.
Right-click on an image to download the .maxpat file directly to disk, which you can then open in Max.]
Example 1: Fade-in and fade-out
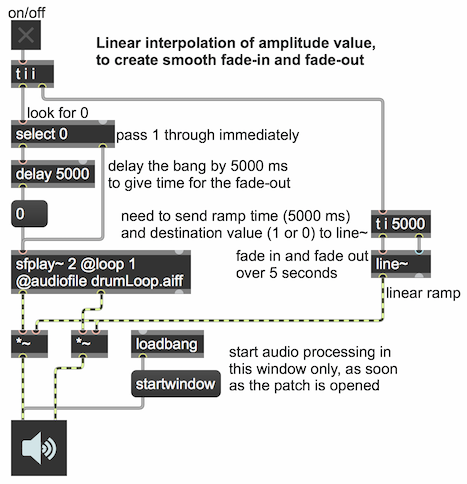
This shows the use of linear interpolation from one amplitude to another to create a smooth fade-in or fade-out. The line~ object expects to receive a ramp time in milliseconds in its right inlet, and then a destination value in its left inlet. (It can also receive those two numbers as a two-item list, <destination value><ramp time>, in its left inlet.) Its output signal will then change linearly from its current value to its new destination value in the specified amount of time. Once it arrives at the destination value, its output signal stays constant at the new value.
Because the fade-out takes a non-zero amount of time, it's necessary to delay stopping the sound file until the fade-out has taken place. So, whereas we can start the fade-in at the same time as we start the sound file, we need to wait for the fade-out to finish before we stop the file. So, we look for the off message (0), using a select object, which will send out a bang when it receives a match, and we then delay that bang with a delay object until the fade-out is done, then the bang triggers the message 0 to stop the sfplay~ object.
Example 2: Vibrato by means of frequency modulation
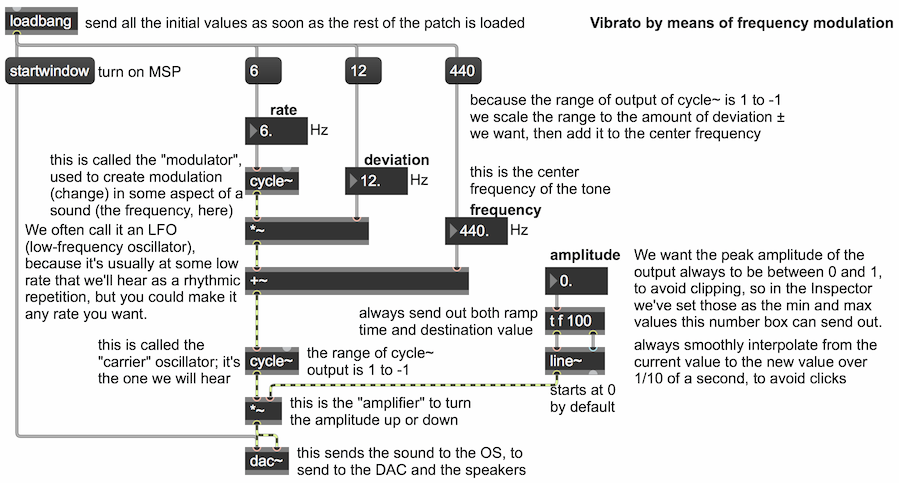
The cycle~ object is an oscillator that produces a sinusoidal tone at any specified frequency. At an audio frequency we can listen to it, and at a sub-audio frequency we can use it as a low-frequency oscillator (LFO) to modulate some parameter of a sound. This patch demonstrates frequency modulation to create a vibrato effect. Try changing the different number boxes until you have a good experience of how each parameter affects the sound, especially the rate and depth of the frequency modulation caused by the modulating oscillator. Try some extreme values to get extreme effects.
Because the fade-out takes a non-zero amount of time, it's necessary to delay stopping the sound file until the fade-out has taken place. So, whereas we can start the fade-in at the same time as we start the sound file, we need to wait for the fade-out to finish before we stop the file. So, we look for the off message (0), using a select object, which will send out a bang when it receives a match, and we then delay that bang with a delay object until the fade-out is done, then the bang triggers the message 0 to stop the sfplay~ object.
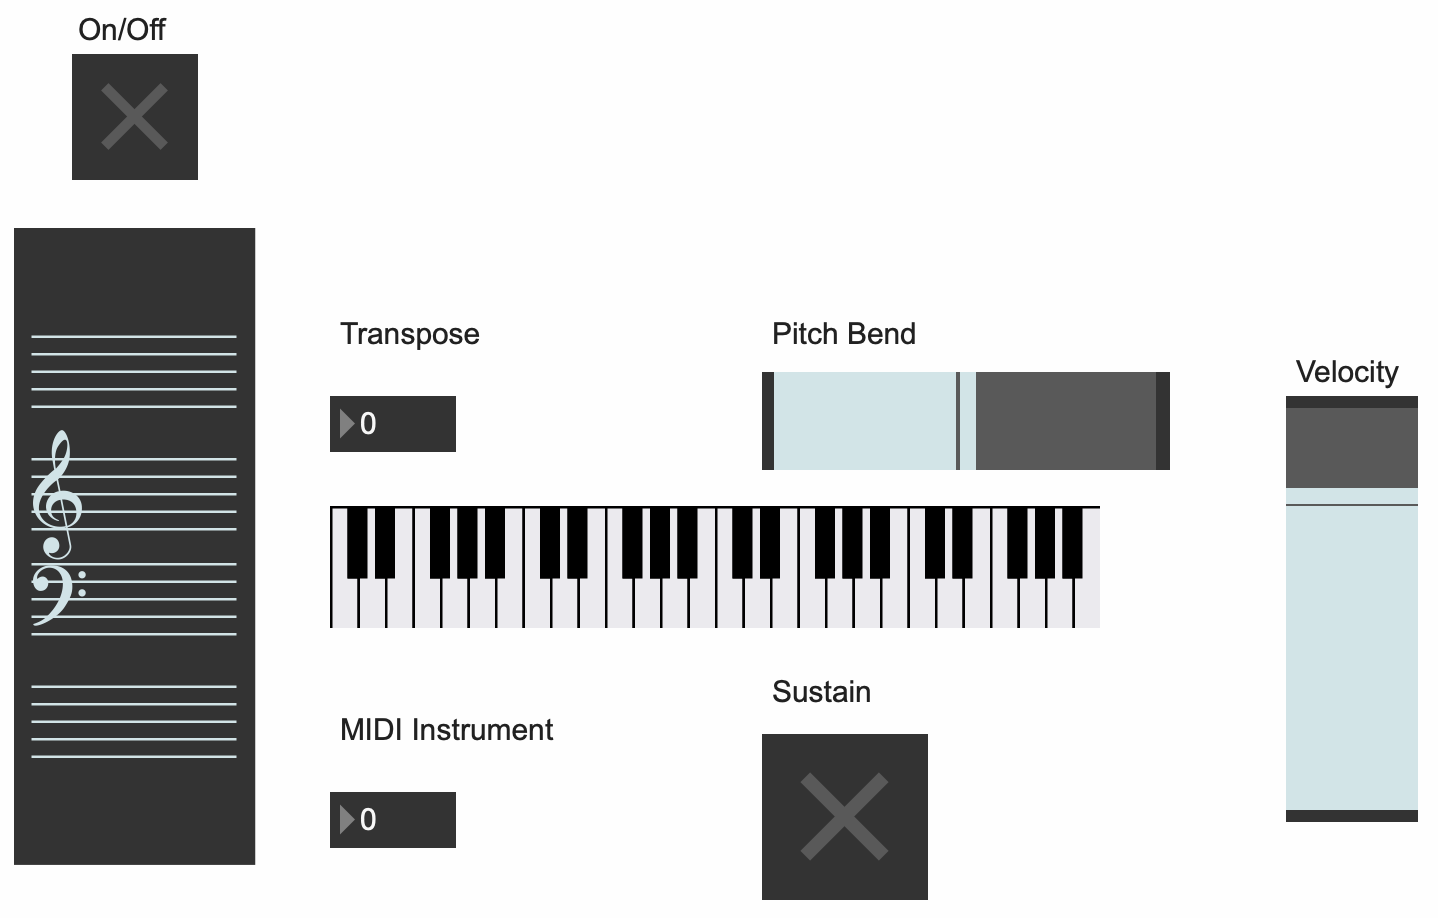
Example 3: MIDI Keyboard Example
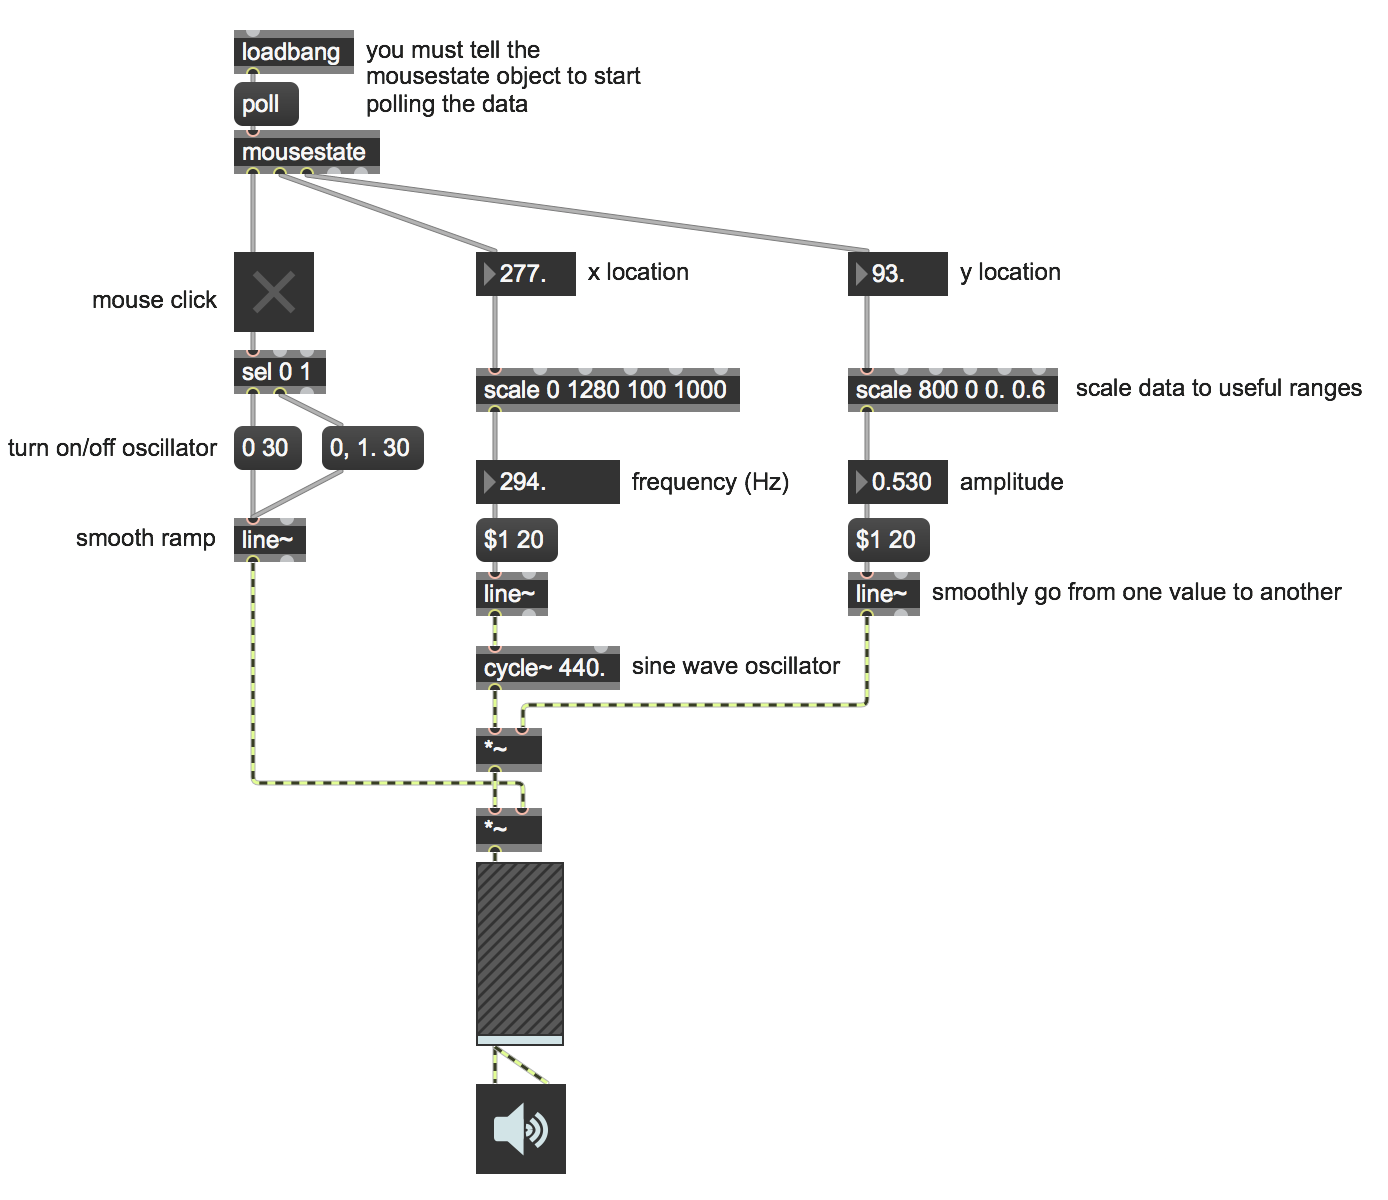
Example 4: Mouse Theremin
Example 5: Saw Synth Demo
Example 6: Schedule a future event
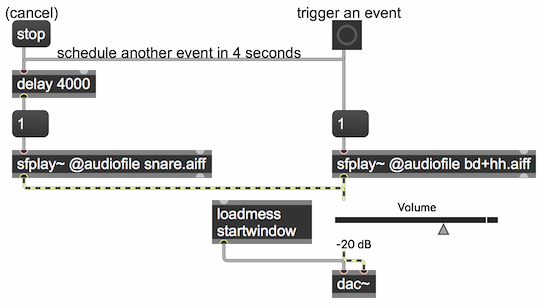
Timing is very important in music. The fundamental way to ensure precise timing of events is to use a scheduler. A schedule is a list of time-tagged events to be executed at specific times in the future. That schedule must be consulted constantly at regular intervals (as often as possible, e.g., every millisecond) to see if any item on the list has a time tag that is less than or equal to the current time; if so, that event should be enacted.
Max has a master scheduler constantly running behind the scenes, and has various objects that allow you to post events on the schedule. The simplest of all of those is the delay object. When delay receives a bang in its left inlet, it schedules that bang to be sent out its outlet after a delay of a certain number of milliseconds, which has been specified in its right inlet. (Alternatively, if delay receives an int or a float in its left inlet, it uses that number to set its delay time, overwriting whatever number was previously set as the delay time, and schedules a bang to be sent out after that number of milliseconds has elapsed.)
The delay object can schedule only one bang at a time. If another bang, int, or float is received in its left inlet before the previously-scheduled bang has been sent out, the previously-scheduled bang will be pre-empted and the new bang will be scheduled instead. The message stop in the left inlet cancels any currently-scheduled bang. If the delay time in the right inlet is changed while a bang is scheduled, that doesn't change the timing of the existing scheduled bang; the new delay time only affects subsequently-scheduled bangs.
In this example, we use a bass drum sound and a snare drum sound as two stand-ins for the idea of "an event", but in fact an event can be any Max message, or combination of messages, even turning on or off other entire processes. The delay time might be only a few milliseconds, to make two things happen in rapid precisely-timed succession, or it could be a much longer time (though still expressed in terms of milliseconds) such as several seconds, minutes, or even hours.
Although it's not demonstrated in this example, it's also possible to specify the delay time in tempo-relative time units, such as 4n for a quarter note, based on the current tempo of the Max transport, but in that case delay will only work when the transport is on.
The Max delay object is comparable to the setTimeout() method in JavaScript. When using JavaScript within a Max js object, the setTimeout() method is not available; the nearest equivalent is the schedule() method of the Task() object, but that will run in a low-priority thread of Max, not in the high-priority scheduler as Max's delay object does.
Example 7: DIY ring buffer
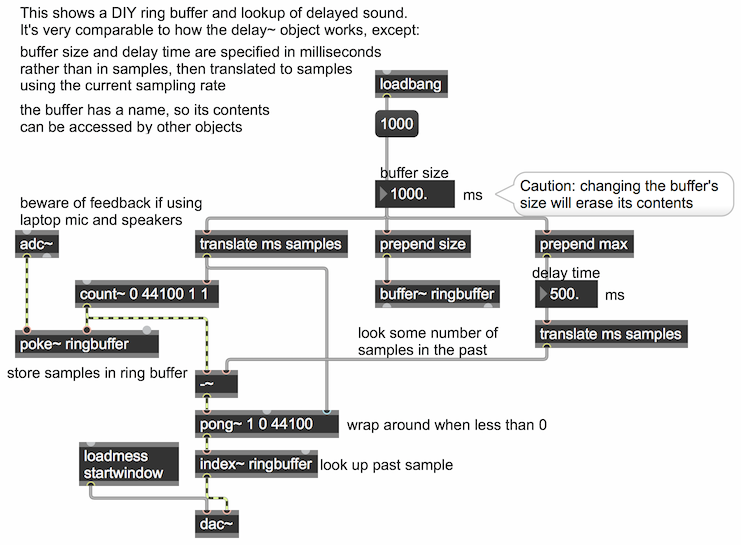
For time-delayed audio, we need to create what's called a "circular buffer" or a "ring buffer", an array of samples to which we record continuously in a loop, and which we can then use always to access the most recently recorded sound from the past.
The MSP object delay~ does exactly that. And another pair of objects—tapin~ and tapout~ does the same thing, but with a minimum delay of one signal vector so that you can even feed the delayed sound back into the delay loop. However, in this example, we build and access a ring buffer ourselves, just to demonstrate inner workings of the process in a little more detail.
The buffer~ object creates an array in RAM for storing sound and accessing it in a variety of ways. Here we create a one-second buffer, and we use a sample counter (the count~ object) to put each sample of the incoming sound (from adc~) into that array, using the poke~ object to access individual sample locations in the array. At the same time, we can use that same sample counter, which is always pointing to the location of the current time in the array, to calculate the signal some amount of time (some number of samples) in the past. If the current time in samples minus the delay time in samples is less than 0, we need to wrap the calculated sample location back into the array (by adding the number of samples in the array); that's what the pong~ object does for us.
You can try this out yourself, but beware of the possibility of feedback, since this patch sends the incoming sound from adc~, with some delay, right back out via the dac~.
Example 8: Algorithmic demo with phasor
Example 9: Amplitude is inversely proportional to distance

Our tympanic membrane (a.k.a. our eardrum) and a microphone are both devices that measure sound intensity. When a sound arrives at our eardrum or at the diaphragm of a microphone, either of which has a certain surface area, the power in that area (i.e. the intensity) is detected. However, the intensity of a sound, as measured by an eardrum or a microphone, will differ depending on the distance from the sound's source, because the sound is being emitted from the source in all directions. If you think of the sound energy as radiating outward from the source in a spherical pattern, and you bear in mind that the surface of a sphere is proportional to the square of its radius (the surface area of a sphere is equal to 4πr2), you can understand that the intensity of a sound as measured in a given surface area is inversely proportional to the square of the distance of the point of measurement from the sound source. This principle is known as the inverse square law: intensity is inversely proportional to the square of the distance from the source (I ∝ 1/d2).
Our subjective sense of a sound's "loudness" is not the same as its intensity, but is generally roughly proportional to it. But what does that mean in terms of the amplitude factor we'll use to alter a sound's intensity in digital audio? As defined in physics, the intensity of a wave is proportional to the square of its amplitude (A2 ∝ I). So that means that if we want to emulate the effect of a sound being twice as far away, (1/4 the intensity), we would need to multiply the amplitude by one-half. Indeed, based on what we know about the relationship between distance and intensity (the inverse square law, I ∝ 1/d2), we can see that the relationship between distance and amplitude is simply A ∝ 1/d; amplitude is inversely proportional to distance.
This patch shows how you can emulate a change of distance simply by changing its relative amplitude inversely. Of course, our sense of distance is also affected by reverberation and high-frequency rolloff, but this basic relationship between distance and ampitude is useful to know for sound spatialization.
Example 10: scope~ and spectroscope~ in Max
Example 11: Line and Line~
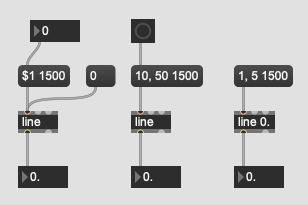
Line object
Often we will find ourselves in the situation where we need to automate the change of a certain value in time, even if only to free ourselves from the burden of having to control the machine. Though there are always multiple ways to achieve the same result, as it happens in most programming languages, in Max we have an object whose sole purpose is to help us solve this specific problem. The line object can interpolate between two numbers in a given time interval. Given a new line object, we can put it to work by sending it a list with 2 numbers. The first number is the number that we want to reach; the second number is the time interval, in milliseconds, for that number to be reached. Using your max skills you can change this message box to include a place holder, so that you don't have retype the message box everytime you need to change its values. Should you send it a single value, the line object will immediatelly jump to that number. Furthermore, you can use this technique to your advantage if you decide to always have the numbers changing in the same fashion, say from 10 to 50 in 1500 milliseconds with the push of a button. Finally, you can also instruct the line object to work with floats, instead of integers, if you set the first argument as an initial floating point number.
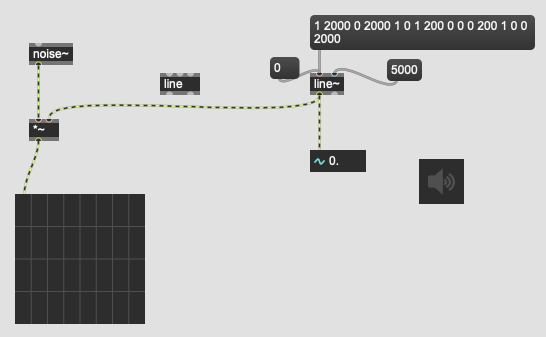
Line~ object
As with many other objects in Max, the line object also has its MSP counterpart, the line~ object. This object functions very much like its Max counterpart with the exception that it outputs a signal instead of a stream of messages. Again, by sending it a list with two numbers the line~ object will interpolate between its current value and the first number you are sending, in the time interval of the second number on the list. This second number can also be sent to the second inlet. The line~ object only has two inlets instead of three because the time grain, the rate at which it is updating its internal value (the values that get sent out) is determined by the audio status settings. Having line object that works in the signal domain allow us to directly interact with other MSP objects. Here I'm multiplying the output of the line~ with the output of a cycle~ object. And sure enough, we can send a longer list of values in order to sculpt our signal with the precision we need. In this example, I will have the sound fade in during 2 seconds, fade out during 2 seconds, jump to full volume and stay there for 200 milliseconds, jump to silence and stay there for 200 milliseconds, and finally jump back to full volume and fade out during 2 seconds.
Example 12: Time-stretch a sound
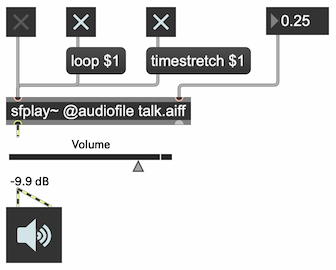
When you change the playback rate of a sound, its speed and total duration change, and as a result, its pitch changes. Time-stretching a sound with phase vocoding results in a change of speed and duration, without a change of pitch. When you turn on the timestretch attribute of sfplay~, by sending the message timestretch 1, the rate value in the right inlet functions as a time-stretching factor rather than a rate factor, so there's no change in pitch. Try comparing the behavior of sfplay~ with timestretch on and timestretch off, and with different time-stretching factors.
Example 13: Pitch-shift a sound
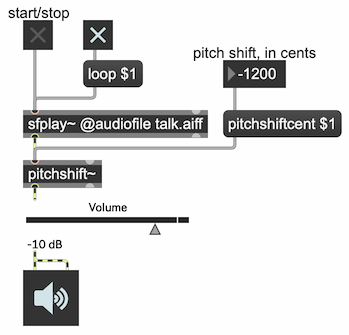
To pitch-shift a sound using phase vocoding, without any change in its speed or duration, use the pitchshift object. You can specify the amount of pitch shift as a ratio (a frequency factor) or, probably more usefully for musical purposes, you can change the pitch in cents (1/100ths of an equal-tempered musical semitone) with the pitchshiftcent attribute. For example, sending the object the message pitchshiftcent -1200 shifts the pitch downward by one octave (equal to 12 semitones).
Example 14: Ring modulation

The principles of ring modulation (multiplication of two audio signals) and amplitude modulation are discussed in the MSP Tutorials titled "Tremolo and Ring Modulation" and "AM Synthesis". This patch modulates a sound file by a cosine wave, allowing you to experiment with different modulation rates (from sub-audio low frequencies for tremolo effects to audio-rate frequencies to create frequency shifts up and down), and to try different depths of modulation (by changing the amplitude of the modulating oscillator), and to add an offset to shift the modulator up or down.
Example 15: Select one of four classic waveform types
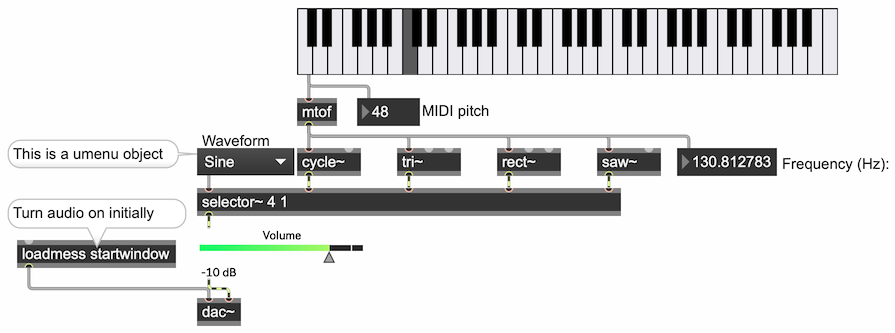
There are four basic "classic" waveforms that were used in early synthesizers: sine, triangle, square, and sawtooth. Max produces anti-aliased emulations of those waveforms with the objects cycle~, tri~, rect~, and saw~.
Many software synthesizers, such as the Subtractor synthesizer in Reason, allow you to select a stored waveform to use in an oscillator. This patch shows how you can do that in Max with the four classic wave types.
In MSP, to select one of several possible audio signals, you can use the selector~ object. The first argument of selector~ determines how many signal inlets it will have, and an additional left inlet is created to specify which inlet's signal should be passed out the object's outlet. In this patch, we have created a selector~ with 4 signal inlets, for the four types of oscillator. The umenu object allows you to make a popup menu, and whichever item the user selects is reported out the outlet. The middle outlet reports the name of the menu item, and the left outlet reports the item number, starting from 0. So, the output from the left outlet of the umenu can be used to control the selector~.
To set up initial conditions in a patch, the objects loadbang and loadmess are essential for triggering messages as soon as the patch is opened. In this patch, the loadmess object is used to send the message startwindow to the dac~ object, turning on audio in only this Patcher window and its subpatches, while turning off audio in every other open window.
Another way to set up the initial value of a user interface object (and the object connected to its outlet) is by setting "Parameter Mode Enable" in the object's Inspector, then setting "Initial Enable" in the Inspector and setting the "Initial Value" to the initial value you want. When the patch is opened, that initial value will be shown in the object, and will be sent out the outlet. That way, the user interface object, and the object it controls, will be set up properly to the desired initial state. In this patch, the umenu is set up initially to item 1, "Sine", which opens inlet 1 (the cycle~ object) of the selector~. The live.gain~ obejct's initial value is set to -10 dB to prevent the output sound being too loud. Initially, all the oscillators have a frequency of 0 Hz, so we don't hear anything until we click on the kslider keyboard to select a pitch (which then gets converted to the appropriate frequency by the mtof object.
Example 16: Detune and mix two oscillators
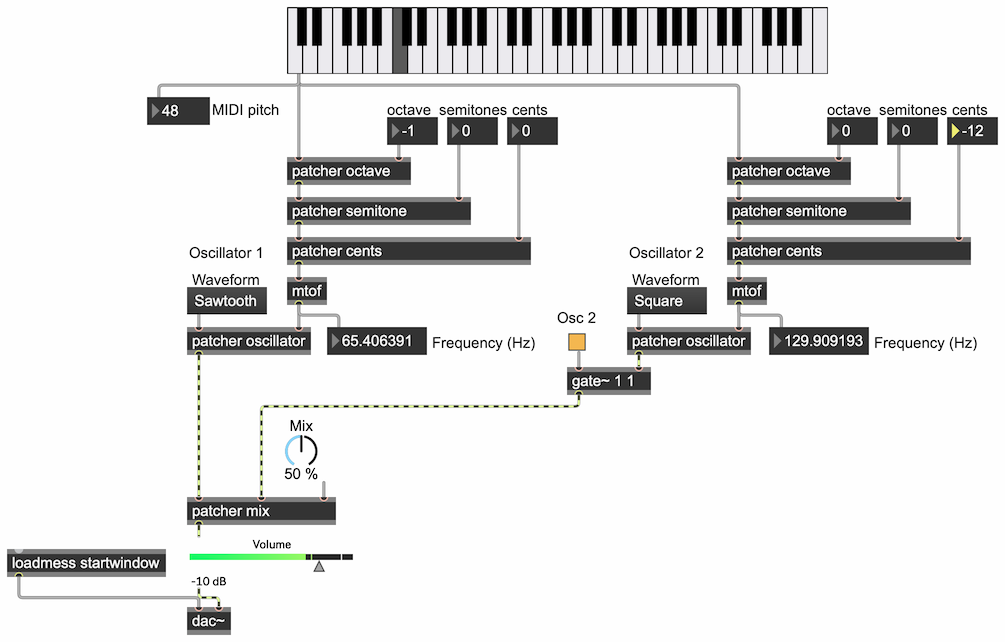
In the Subtractor synthesizer in Reason, two carrier oscillators are mixed together. Either can be any of a number of different waveforms, and either can be detuned by any number of octaves, semitones, and/or cents (100ths of a semitone). This patch emulates those same capabilities.
The different components of the patch are encapsulated in patcher objects. The detunings are done by adding offsets of either multiples of 12 semitones (for octaves), or some number of semitones, or 100ths of semitone. Then the resulting pitches are converted to frequency for the oscillators. The two oscillators are mixed in the the patcher mix object, the contents of which are explained in the Max Cookbook example titled "Mix two sounds (more efficiently)".
Experiment with different wave types, detunings, and mixtures.
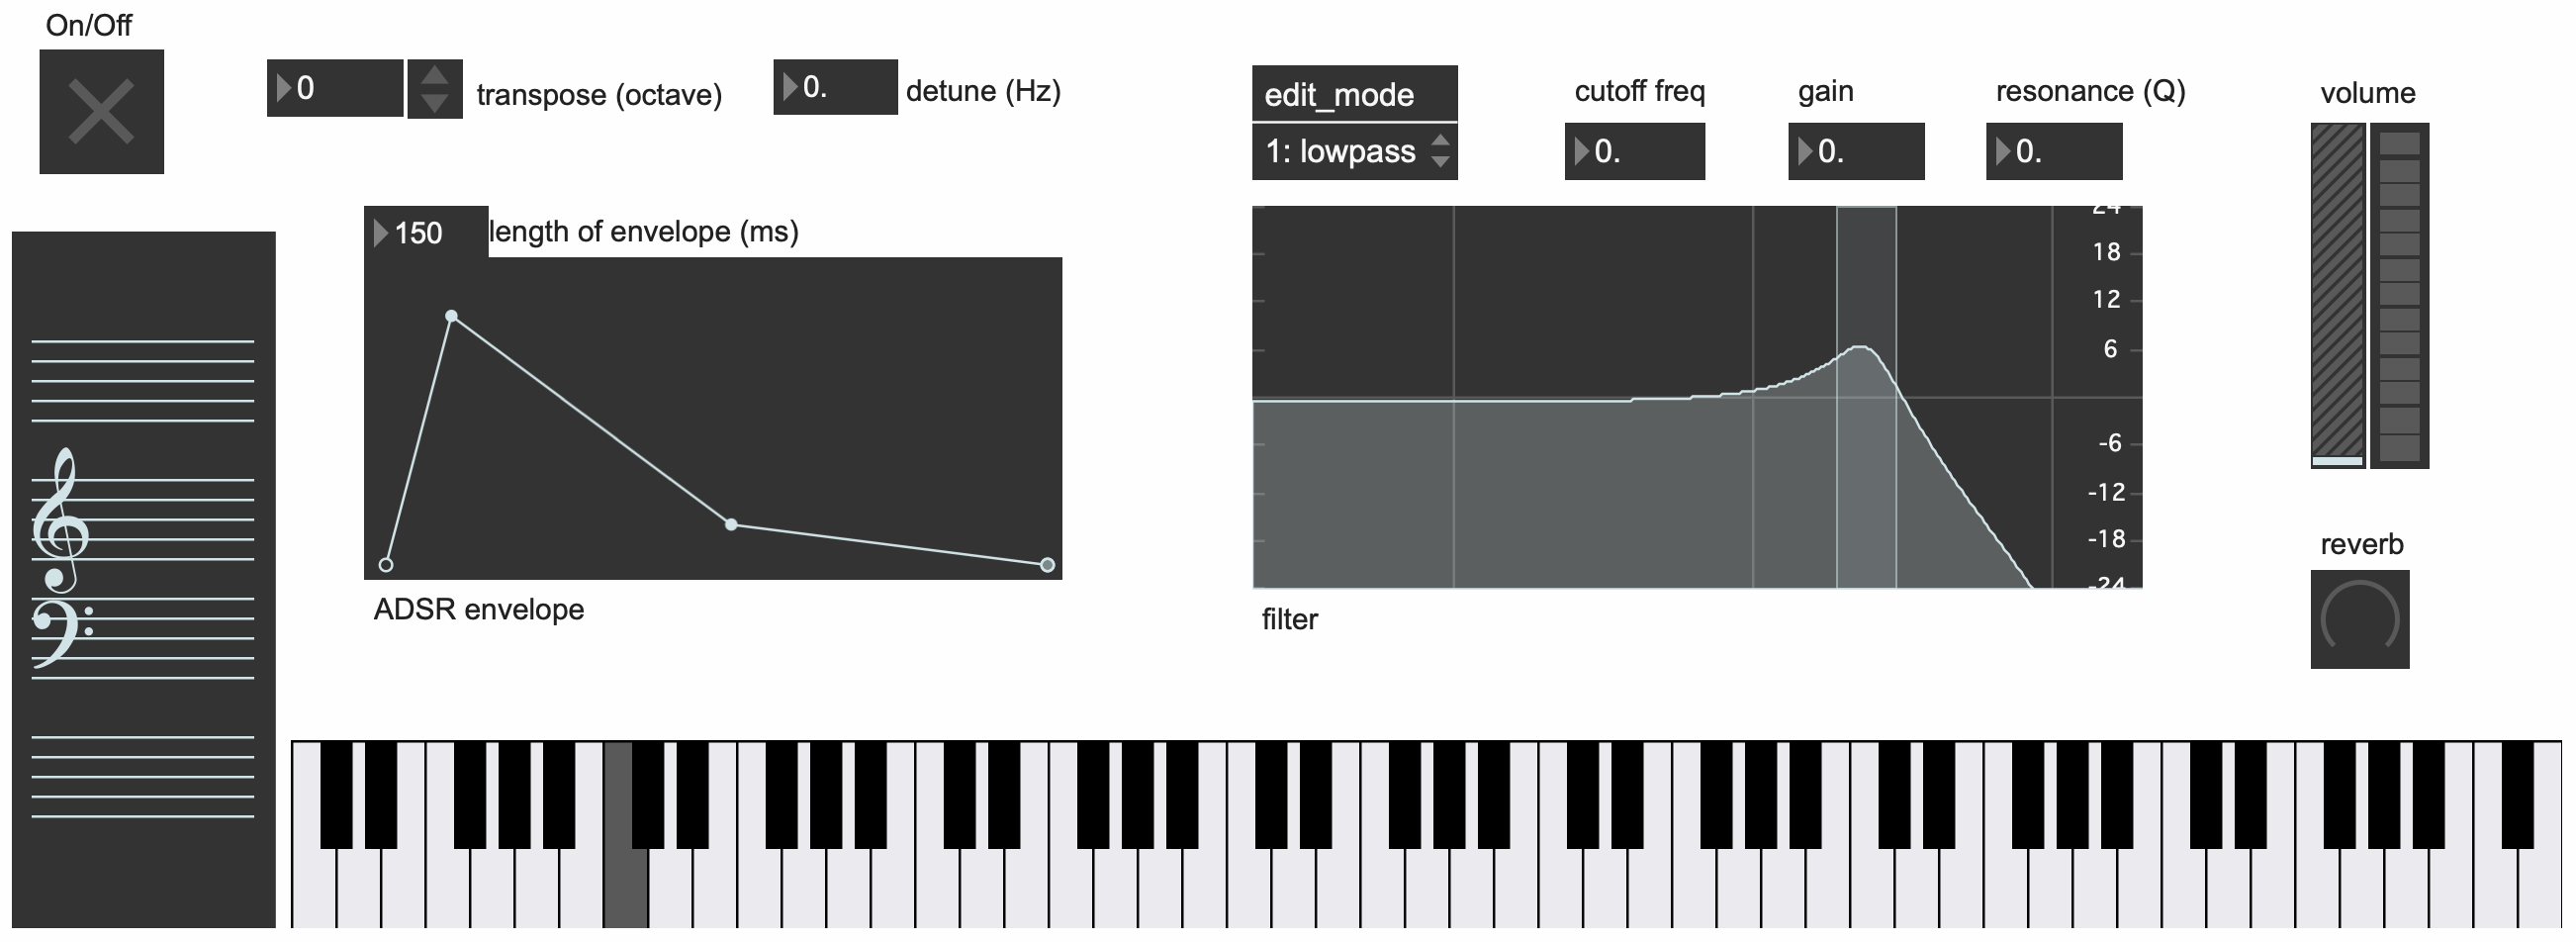
Example 17: ADSR envelope for 2-oscillator synth
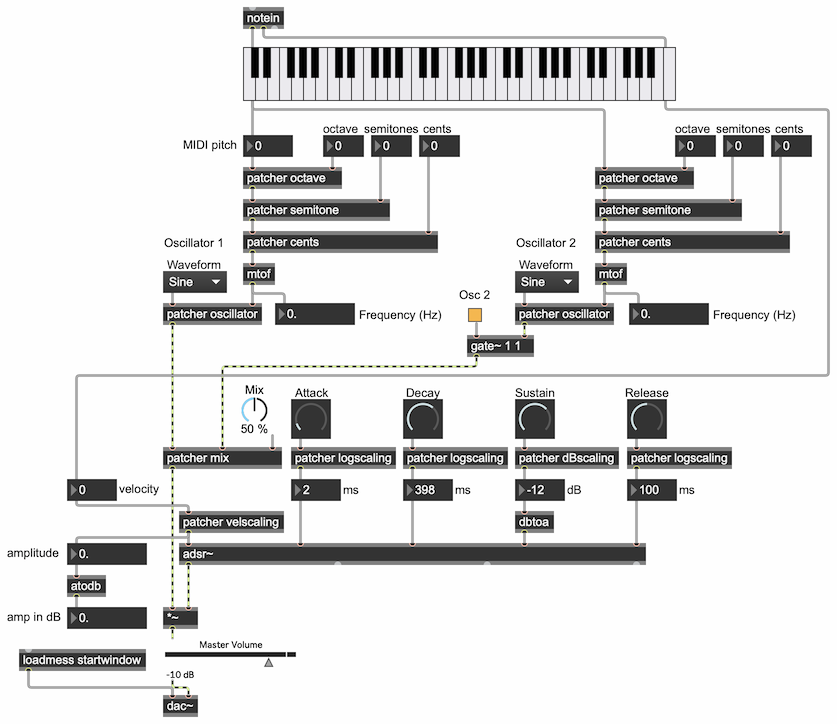
This patch is based on the 2-oscillator synthesizer in the example titled "Detune and mix two oscillators". Here we have added ADSR amplitude envelope control, using the adsr~ object, which is explained in the Max Cookbook example "ADSR amplitude envelope". The keyboard has been set to "Touchscreen" mode in the Inspector, which makes it send out a note-on velocity when you click on a key, and send out a 0 velocity when the cursor leaves the key or the mouse button is released. You can also provide note-on and note-off messages from an attached MIDI keyboard, via the notein object.
Try different attack and release times to get a sense of how those parameters of the amplitude envelope affect the onset and termination of a note. Notice that the effect of the note-on velocity and the of four dials is not a simple linear mapping into amplitude level or time in milliseconds. The input values to adsr~ are each obtained using mathematical formulae that have been chosen to try to make the most useful possible mapping. For example, a note-on velocity of 127 results in a peak amplitude of 1., and each reduction of 16 from there results in a change of -6 dB, corresponding to our perception of loudness. The dials for attack, decay, and release times use an exponential scaling formula that concentrates the first half of the dial in very short time values, less than 100ms, and only the upper fourth of the dial in time values greater than 1 second. The sustain level is shown to the user in the perceptually intuitive units of decibels, and then later converted to linear amplitude for adsr~.
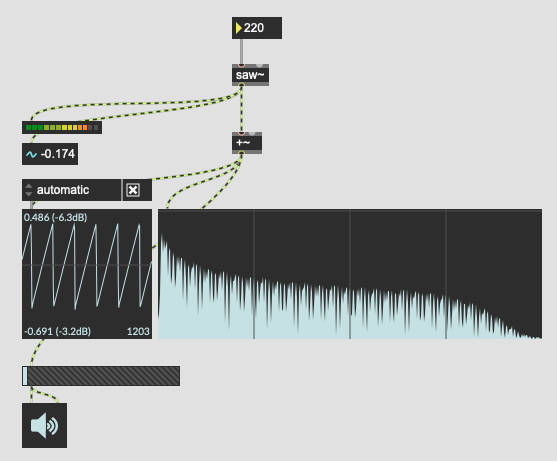
Example 18: Wobble bass with rhythmic filter sweeps
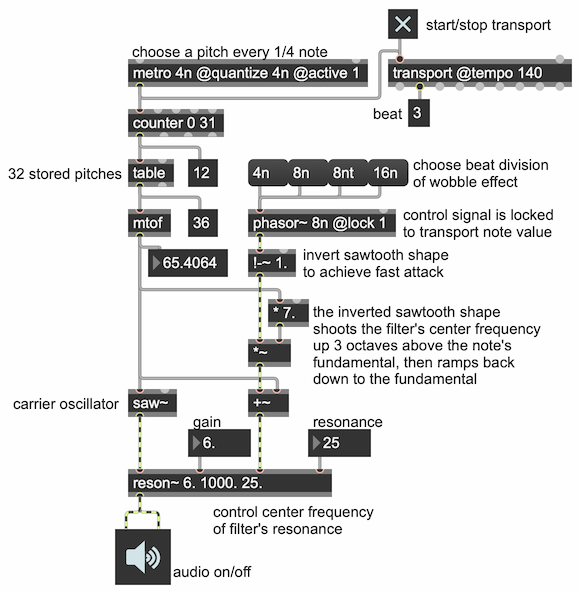
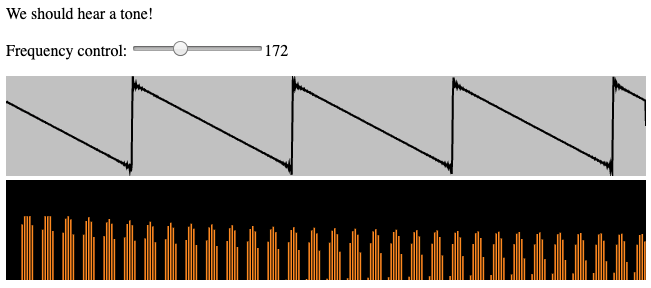
A common sound in dubstep music is the so-called "wobble" bass, a bass line that implies a repetitive rhythm through some internal characteristic of its sound, usually an LFO-controlled rhythmic sweep of a lowpass or bandpass filter. In this example, we use a sawtooth waveform as the control signal to sweep a bandpass filter up and down on a harmonically-rich sawtooth oscillator.
The example shows how the MSP phasor~ object can have its rate specified as a transport-dependent note value such as 8n, 8nt, 16n, etc., and can be locked to be in sync with the transport's sense of beat timing. Notice that the amplitude of the oscillator is not being changed in this example, only its filtering, but the upward filter sweep is so sudden as to give the impression of an attack on each of the specified beat divisions. The resonant center frequency of the bandpass filter—in the third inlet of the reson~ object—is always based on the fundamental frequency of the note currently being played by the oscillator. The control signal—from the phasor~ object—offsets the filter frequency suddenly up to 8 times that (i.e., three octaves above the fundamental), then ramps it back down to the fundamental.
Turn audio on, click on the toggle to turn on the transport, then choose different note values to change the rhythmic rate of the phasor~.
Example 19: Convolution Reverb
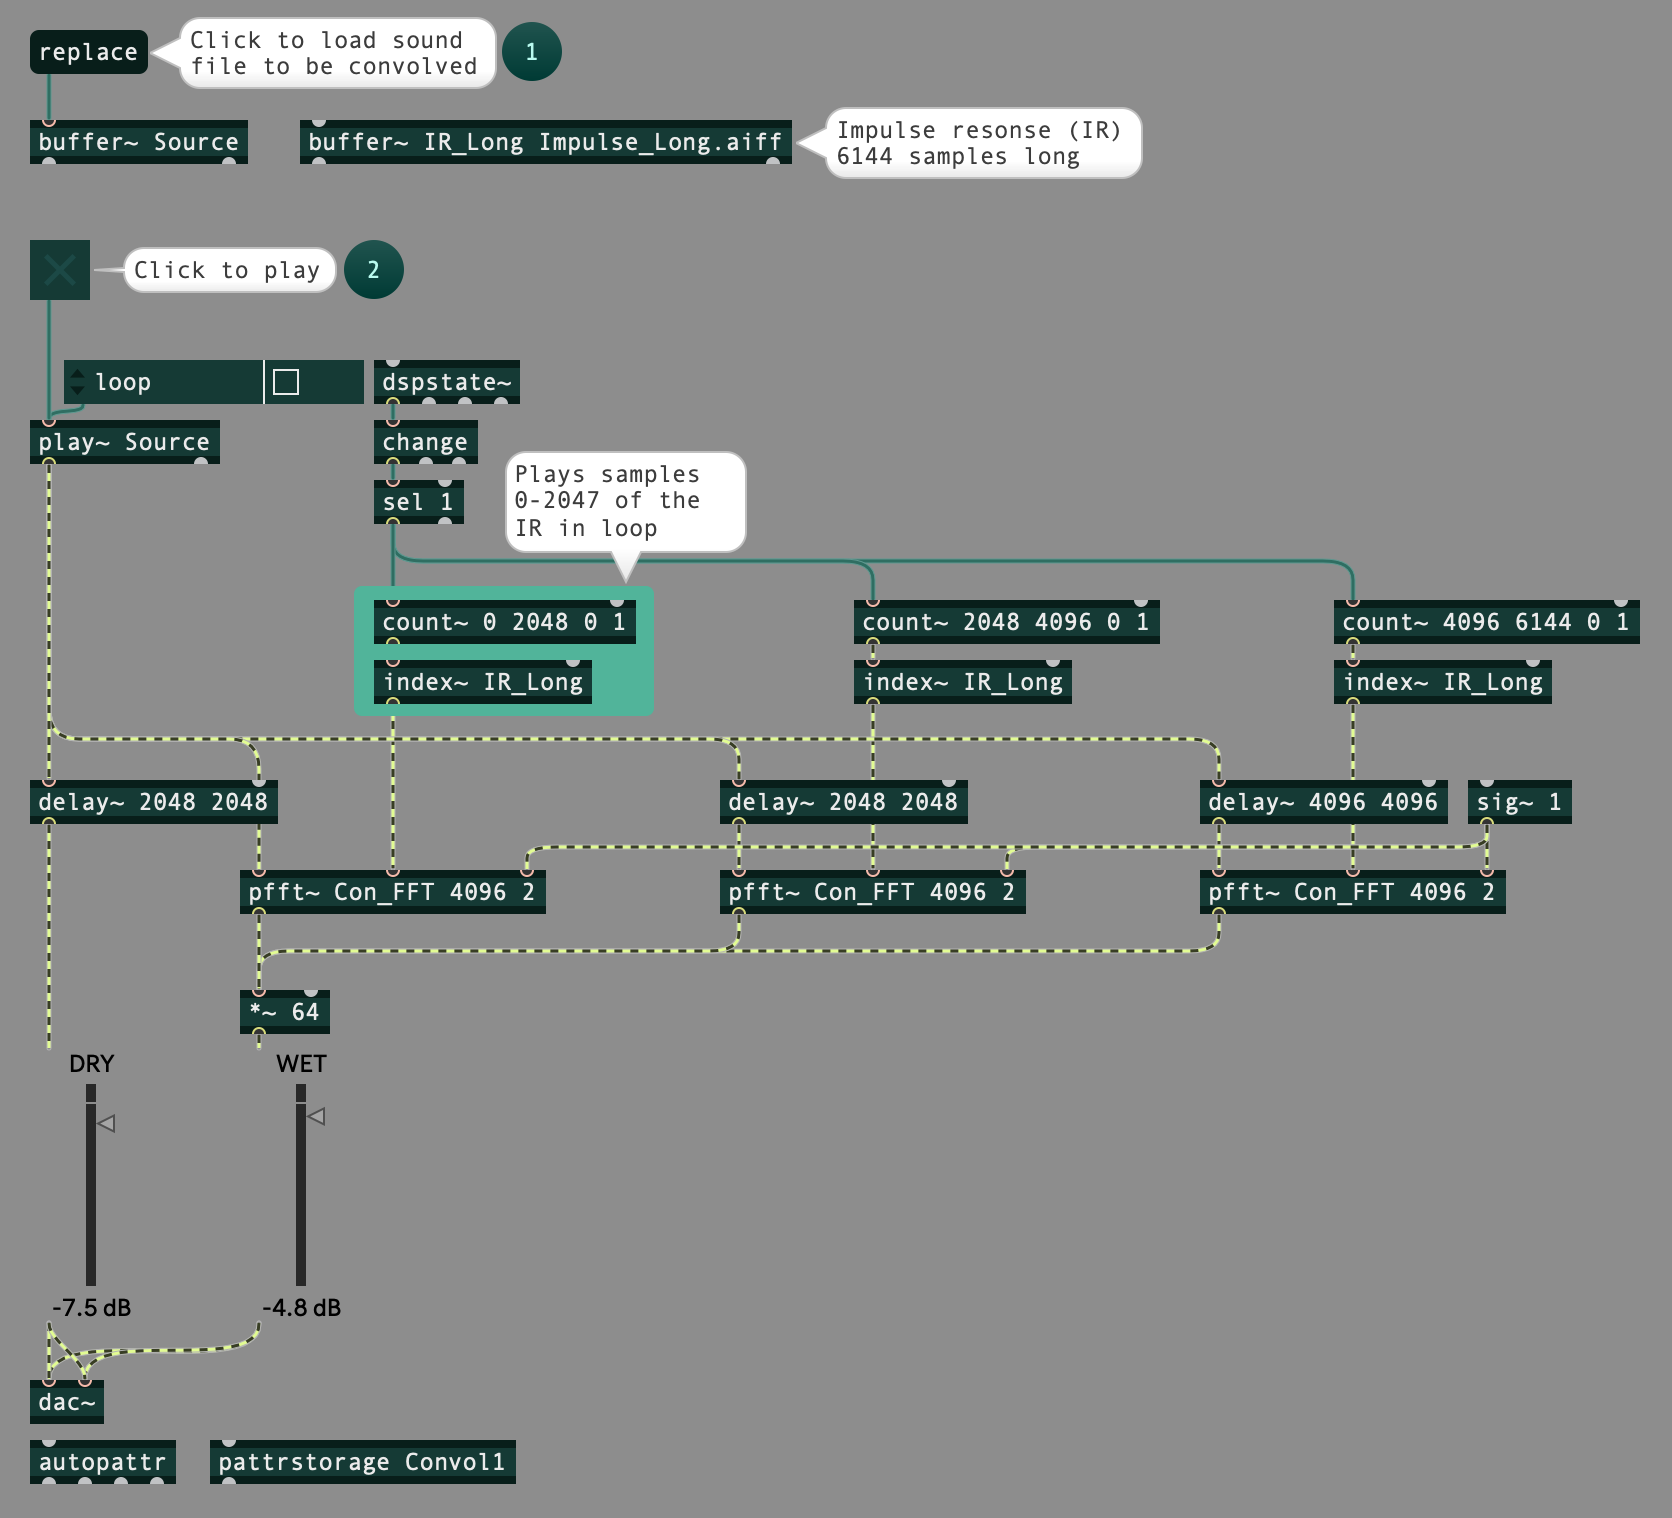
A good way to add realistic reverb to a sound is convolution. In essence, convolution in the time domain consists of multiplying every sample of one signal by (and delaying it by the same amount as) every sample in another signal, and adding the results. To create reverb using this method, every sample of the dry sound is multiplied by (and delayed by the same amount as) every sample of an impulse response (IR). An IR is a representation of what will be heard when a very short pulse of white noise is played in a certain space. A close approximation of how another dry sound might be heard in that space can be achieved by convolving that sound with the IR.
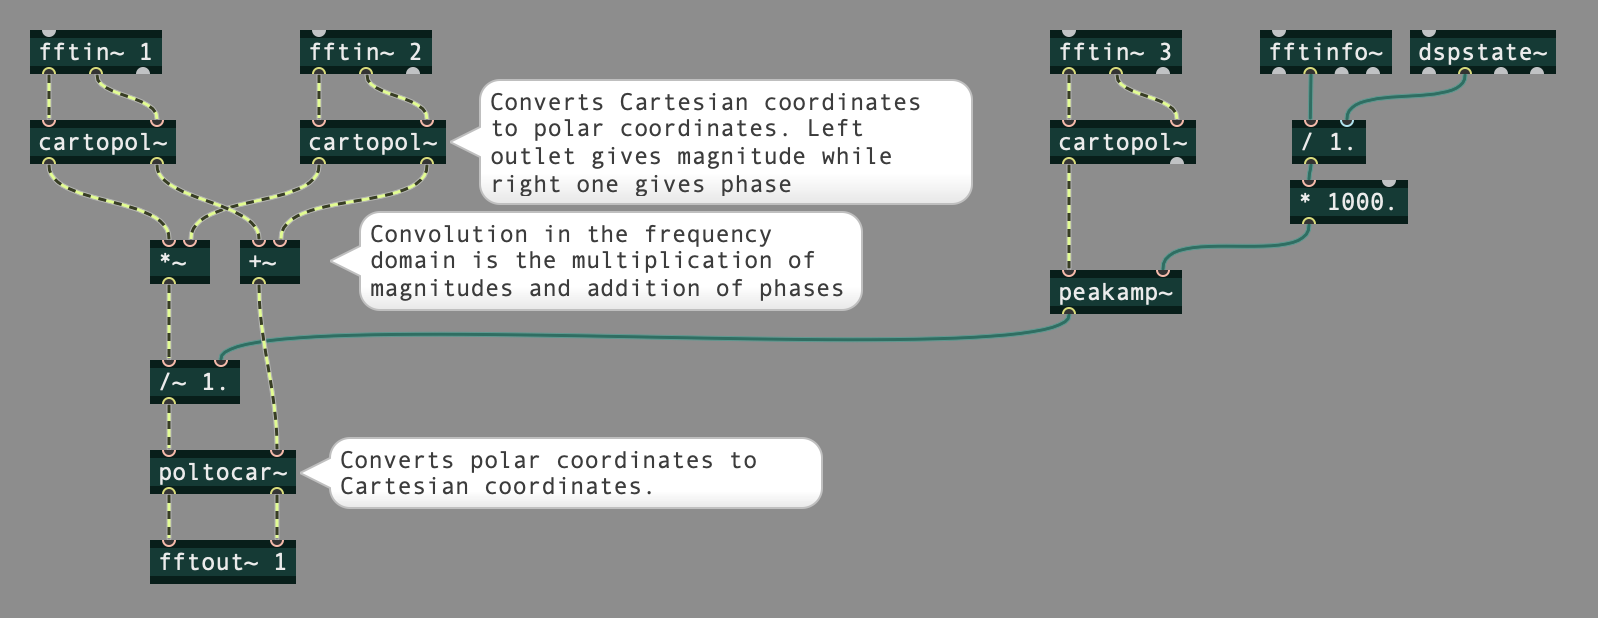
An efficient way of performing convolution is to do the calculations in the frequency domain rather than the time domain. In the frequency domain, convolution is the multiplication of the magnitude and the addition of the phase of each frequency bin of the Fourier transforms of the two signals. In this example, an IR with 6144 samples is used. The patch shown in the bottom image performs the convolution, and three instances of this patch are loaded inside the pfft~ objects in the main patch shown in the top image. The pfft~ instances are performing convolution using different segments of the IR. The dry signal is fed to each instance with a delay time corresponding to the segment of the IR that the instance is dealing with. This process creates convolution reverb with a tail length of 6144 samples.
N.B.: Once you expand the zip file for this example, you will find three files. For this example to work, they have to be in the same folder. Convolution_Long.maxpat is the main patch, Con_FFT.maxpat is the subpatch used by the pfft~ objects, and Impulse_Long.aiff is the impulse response.
WebAudio Examples
Example 1: Synthesizer with vibrato
Here is a basic synthesizer in Web Audio, designed by Chris, with a sawtooth oscillator, a simple attack-release amplitude envelope, and sinusoidal vibrato by means of frequency modulation with an LFO. The notes are played by keys of the computer keyboard. MIDI velocity is simulated by setting a note-on velocity value to control the notes' peak amplitude. The rate and depth of the vibrato can also be set by the user.
Synthesizer with vibrato <vibratosynth.html>
There are lots of explanatory comments in the vibratosynth.js file.
Example 2: Oscilloscope and Spectroscope in Webaudio
Try this html file and check the js file too.
Example 3: 3 ways to get your own Local Web Server
These are 3 ways to get a Local Web Server running. Method 1: using Nodejs. Navigate to nodejs.org and install Nodejs. Once you have Nodejs installed, navigate to npmjs.com and search for "local web server". Open the package page and scroll down to copy the install command. Open a terminal window and paste the install code and run it. Once you have both Nodejs and Local Web Server installed, navigate to the folder for which you want to serve its files. Type "ws" and press enter. You web server is running on port 8000. On a browser, navigate to localhost:8000. These are the files that you are serving. Open an html page, and confirm that it is working. Go back to the terminal window, and press control-C to end your server. Method 2: using Python. If you have Python 2.7 installed on your machine, you can navigate to the folder that you want to host and type: python -m SimpleHTTPServer. Then press enter and your server will be running on port 8000. On a browser, navigate to localhost:8000. Open a file, and confirm that it is working. Go back to the terminal window and push control-C to end your server. Method 3: using google chrome. Open Google and search for: google chrome web server. Open the link for the chrome web store and install Web Server for Chrome. After installing Web Server for Chrome, open a new tab and navigate to apps to open the Web Server. On the window that opens, you might want to click "Choose Folder" to select the folder that you want to host. Copy the web server URL, and paste it in the browser. Open a file, and confirm that it is working. Go back to the Web Server for Chrome window to disable the webserver.
Example 4: Volume Fader
This example demonstrates a way to give a user control over the volume of a sound. It also demonstrates a way to do a timed fade-in or fade-out, using the setInterval() method in JavaScript.
Volume Fader <volumefaderjs.html>
Example 5: Volume Fader in Decibels
To make the change in a slider correspond well to our subjective sense of loudness, in JavaScript we need to map the slider value to the 0-to-1 range of volume using an exponential mapping. This example demonstrates a way to give a user control over the volume of a sound, with a linear change in the slider position actually causing an exponential change in the amplitude of the sound playback. It also demonstrates a way to do a timed fade-in or fade-out, using the setInterval() method in JavaScript. You can compare and contrast this effect with the linear fade demonstrated in Example 4.
Volume Fader in Decibels <volumefaderdbjs.html>
Example 6: Show MIDI Input
This example shows how to get MIDI input in a browser, how to parse MIDI channel messages, and how to access and interpret the data bytes. It's just a MIDI "monitor" that looks at the incoming MIDI messages and reports the information. This could serve as the foundation for an application that uses MIDI messages to control a synthesizer.
First, the page's JavaScript queries the browser to see if the browser understands the Web MIDI API. Just about all modern browsers do. If so, it then requests access to the available MIDI devices, requests a listing of the input devices, and assigns a handler function to the onmidimessage event that might come from any of those input devices. The handler function will parse the MIDI message and respond to it.
In this example, we print what kind of message it is, and if it's a MIDI channel message (status bytes 128-239) we report details of its contents. The first byte in a message is the status byte, of which bits 0-3 indicate the MIDI channel (a value 0-15 indicating MIDI channel 1-16) and bits 4-6 indicate the message type (note-on, note-off, polyphonic key pressure, continuous controller, program change, aftertouch, or pitchbend). We use bit-masking to isolate the bits of the status byte that we want to examine. The type of message determines how many additional data bytes there will be in the message, and what they mean.
The information is printed into a scrolling text box, which is created by a <div> element with style="overflow: auto". After each new line of text (each new MIDI message report) is added to that text box, we reset the scrolling position of the textbox to the bottom of the box, so that when the textbox fills to overflowing and begins to scroll, the most recently added message will be shown.
Show MIDI Input <showmidijs01.html>
Example 7: Draw a Sound
Once we get audio data into an array (an AudioBuffer), we can graph the peak amplitudes in that data to show the sound's amplitude envelope. To get the sound into an array, we use an XMLHttpRequest to get an audio file, put it in an array of binary data, decode it, and place it in the buffer of an AudioBufferSourceNode. The <canvas> element in the Web page provides a drawing space in which we can draw our graph with primitive drawing commands.
It probably goes without saying that in order to draw a sound, which consists of tens of thousands of samples, in the space of a few hundred pixels, we'll need to reduce the amount of information substantially. To figure out how to do that, we divide the sound into "chunks"; we divide the total number of samples in the sound by the number of pixels there are in the horizontal (width) dimension of the canvas. We then step through each of those chunks, and in each such chunk of audio samples we look for the minimum and maximum value, and we draw a line to those values in the graph. The result is an overall depiction of the peaks and troughs in the signal, which shows us the amplitude envelope.
Draw a Sound <drawasoundjs.html>
Example 8: Recurring timed events in HTML5
Most programming languages provide a means of getting a numerical representation of the current time with millisecond or microsecond (or even nanosecond) accuracy, such as the System.nanoTime() method in Java and the cpuclock object in Max. By comparing one instant to another, you can measure time intervals or durations with great accuracy.
In JavaScript in HTML5, the performance.now() method will report the current time with microsecond accuracy. Even without knowing the current time, though, you can schedule events to happen at specific moments in the future in JavaScript with (approximately) millisecond accuracy. The WindowTimers method setTimeout() lets you schedule a named function to be executed a certain number of milliseconds in the future. The format is var theID = setTimeout( theFunction, N ); where N is the number of milliseconds in the future that you want theFunction() to be executed. You can also use a WindowTimers method called setInterval() to schedule a recurring function call every N milliseconds. The methods setTimeout() and setInterval() return a unique ID which can serve as pointer to that scheduled task. It's important to keep track of that pointer, by storing it in a variable, so that you can later clear (unschedule) the task with the method clearTimeout( theID ) or clearInterval( theID ).
This Web page does nothing more than test the accuracy of the setInterval() method. The script uses the performance.now() method to measure how much time elapsed between the time setInterval() was called and the time it reports with each function call. Because performance.now() provides time with microsecond precision, we can see that each setInterval() function call might be off by some fraction of a millisecond. In fact, depending on how busy the client computer is, the timing could be off by more than that. However, this test appears to demonstrate that a) setInterval() seems to compensate for its own lateness on the next function call, so that it doesn't suffer from excessive time lag over the long term, and b) the inaccuracies are generally not so great as to be musically bothersome. The inaccuracies could be problematic in certain very time-crucial circumstances, though, and these WindowTimers methods are not sample-accurate for audio processing purposes, nor are they in any way explicitly related to the audio sample-rate timing of the Web Audio API.
Test performance of the setInterval() method in HTML5
Example 9: Scheduling timed notes in HTML5
Although the WindowTimers.setInterval() method is not explicitly linked to the sample-rate timing of the Web Audio API, in many cases it can be sufficiently accurate for timing of audio events. In this example we use setInterval() to schedule a recurring pattern of notes events in Web Audio API. Try it and see if it is adequately accurate on your computer.
The script creates an array of sixteen pitches and an array of sixteen loudnesses, and uses those arrays to play a recurring pattern of sixteen synthesized notes in a loop, with each note scheduled by setInterval(). Note that the duration of each note is not quite as long as the time interval between note onsets. That produces a very slightly staccato or détaché articulation of the notes, but more importantly it avoids any potentially disparity between the timing of the notes' amplitude envelope and the timing of the setInterval() method.
This script also includes handy functions mtof() for converting MIDI-style pitch numbers to their corresponding frequency, and dbtoa() for converting loudness in decibels into their corresponding linear amplitude.
Schedule notes with setInterval()
Example 10: Scheduling audio events in Web Audio API
In the Web Audio API a parameter of an audio node (an AudioParam) can be changed with sample-accurate timing. Each AudioNode object, such as an oscillator node or a gain node, has one or more properties—the frequency value of an oscillator node or the gain value of a gain node—which can be set at specific times, either immediately or in the future.
In this example, we create our own "instrument" object consisting of an oscillator node and a gain node, and then we schedule notes to be played on that instrument at specific times by setting the frequency of the oscillator node and the gain of the gain node. To do that, we create an array of pitches and an array of volumes, and establish a beat tempo. Then we step through the two arrays, scheduling different pitches and volumes to happen at specific times based on the tempo. The program schedules 64 notes at once, then plays them.
Example 11: Delay with Feedback in Web Audio API
To create echo effects, one needs to create a circular buffer to store and recall recent sound data. The Web Audio API provides an AudioNode interface called DelayNode that implements this digital delay line for you.
When you create the DelayNode, you specify a maxDelayTime (or, if not specified, it is 1 second by default), and that sets aside enough memory to store the corresponding number of samples. The delayTime property specifies how far in the past the DelayNode will look in its input buffer to determine what to send out as its output. Thus, the DelayNode in Web Audio API is comparable to the delay~ object in MSP.
Sending the output of a digital delay line back into its input presents the potential danger of infitine recursion (calculating the delay of a delay of a delay, et cetera ad infinitum), so if you want a feedback delay, the delayTime must always be at least as great as the block of samples being calculated by the system. In MSP, the delay~ object does not allow feedback, and to do feedback you must use the tapin~ and tapout~ objects instead, which have a minimum delay time of one signal vector (the block of samples that MSP objects calculate at one time). In Web Audio API, you can create a feedback loop in which the output of a DelayNode is eventually routed back into its input, but in that case the minimum delay time will automatically be set at one render quantum, which is 128 samples (thus, 2.67 ms at a sampling rate of 48 KHz).
Whenever you implement feedback in an audio delay line, you need to diminish the amplitude of the signal being fed back, otherwise the sum of the feedback and the input signal will accumulate and grow out of control. In this example, we include volume control at three points in the system (with three Gain nodes)—gain of the sound source being used as input to the Delay node, gain of of the output of the Delay node, and gain of that output signal being used as feedback into the Delay node—and we give the user control over each of those gains.

Delay With Feedback in Web Audio API
Example 12: Stereo panning in Web Audio API
In the Web Audio API there is a PannerNode for altering the intensity of the sound in each of the two stereo channels according to its onstensible location and orientation in virtual 3D space. The PannerNode allows you to take into account the sound source's virtual location (X, Y, and Z position) relative to the listener's position, the sound source's orientation (which direction it's facing), the directionality of the sound source (how much the intensity diminishes when the source is not facing right at the listener), and various other settings for how much the intensity should change based on those factors. The PannerNode deals only with the amplitude of the sound, and doesn't take into account other possible alterations such as filtering, reverberation, etc. However, it does offer an "HRTF" panning mode that uses head-related transfer functions.
Web Audio API also provides a simplified StereoPannerNode, with just one parameter, pan, that lets you specify the sound source's virtual location on the X axis. The StereoPannerNode implements amplitude-based stereo panning employing an efficient constant-intensity algorithm that's essentially identical to the method shown in the Max Cookbook examples "Constant power panning using table lookup" and "Constant-intensity panning subpatch". That's the method shown in this example. (The MDN Web Audio API reference page for StereoPannerNode also provides a simple and clear StereoPannerNode example.)
In this example, we create our own "instrument" consisting of a 10-millisecond burst of white noise that goes to a StereoPannerNode and then to a master volume GainNode. The Start button uses the setInterval() method to set up a repeating callback to a playNote() function that periodically (5 times per second) opens a 10 ms window on the white noise. You can use the sliders to control volume and panning, and you can also use the Pan Left and Pan Right buttons to do a timed pan to one speaker or the other.
Stereo Panning Demo <panningdemojs.html>